Build and Deploy a Multi-File RAG App to the Web

Part 2 — Deploying to the web using Hugging Face Spaces
This is the second of a two-part series of articles on building and deploying a Gradio AI-based web application.
This part is all about how to deploy your finished app to the world wide web using Hugging Face Spaces.
PS. If you want a sneak peek at the deployed app on Hugging Face Spaces, click on this link
I’ve talked about Gradio before in many of my articles. In my opinion, it’s one of the easiest ways to build a GUI app on top of your Python code.
If Gradio is completely new to you, or you’re only vaguely aware of it, I suggest checking out my article below where I introduce who they are and what they do. I also show some small sample code snippets showing Gradio in action.
In a previous article, I took you through the process of building a Mutli-file RAG chat app that can upload, read and analyse various document formats including PDF, Text, Microsoft Word and Excel files. Check the link below if you haven’t seen it yet.
Build and Deploy a Multi-File, Multi-Format RAG App to the Web
Now that you have a new super-duper Gradio app, the next question you might be asking is “How do I share this with the world?”
One of the ways, which is also FREE, is to deploy on Hugging Face Spaces. In the rest of this article, I’ll show you how to do this.
Who is Hugging Face?
If you haven’t heard of Hugging Face (HF) before, it’s a prominent technology company and community platform in the field of artificial intelligence and machine learning. They also happen to own Gradio. HF is made up of several distinct parts. The main ones are.
- An AI Platform.
It facilitates the development, sharing, and deployment of machine learning models, particularly in natural language processing (NLP).
2. Model Hub.
They maintain a vast repository of pre-trained models that developers and researchers can use, adapt, and build upon.
3. Transformers Library.
Hugging Face is famous for its Transformers library, an open-source library that provides thousands of pre-trained models and an API to perform tasks on texts, images, and audio.
4. Spaces.
- Spaces is a platform provided by Hugging Face that allows developers, researchers, and machine learning enthusiasts to easily host, deploy, and share machine learning models and demos. As this is what we’ll be using, let's dive a bit deeper into what benefits Spaces provides.
- Spaces provide free hosting for machine learning demos and applications.
- It aims to simplify the process of deploying and sharing machine learning models and applications.
- It allows for the creation of interactive demos for AI models without needing extensive web development skills.
- It supports Gradio and Streamlit, two popular frameworks for creating AI GUI apps.
- Continuous deployment ensures your app automatically updates when you push changes to the linked GitHub repository
Pre-requisites
Before deploying to HF, there are a few things you need.
1/ Git installed on your system. Instructions for that are here. But this isn’t a tutorial on Git, so I’m assuming you have a basic knowledge of how to use it.
2/ A hugging face account. This is free. Head over to,
Hugging Face - The AI community building the future.
You should see a screen like this, where you can register and/or sign in.

3/ You also require a Hugging Face token, Again, this is free.
- Go to https://huggingface.co/settings/tokens
- Click on “New token”
- Set the token type to Write
- Give it a name (e.g., “Git access token”)
- Click “Create token”
- Copy the token immediately and save it somewhere (you won’t be able to see it again)
Create an HF Space
Click the link below
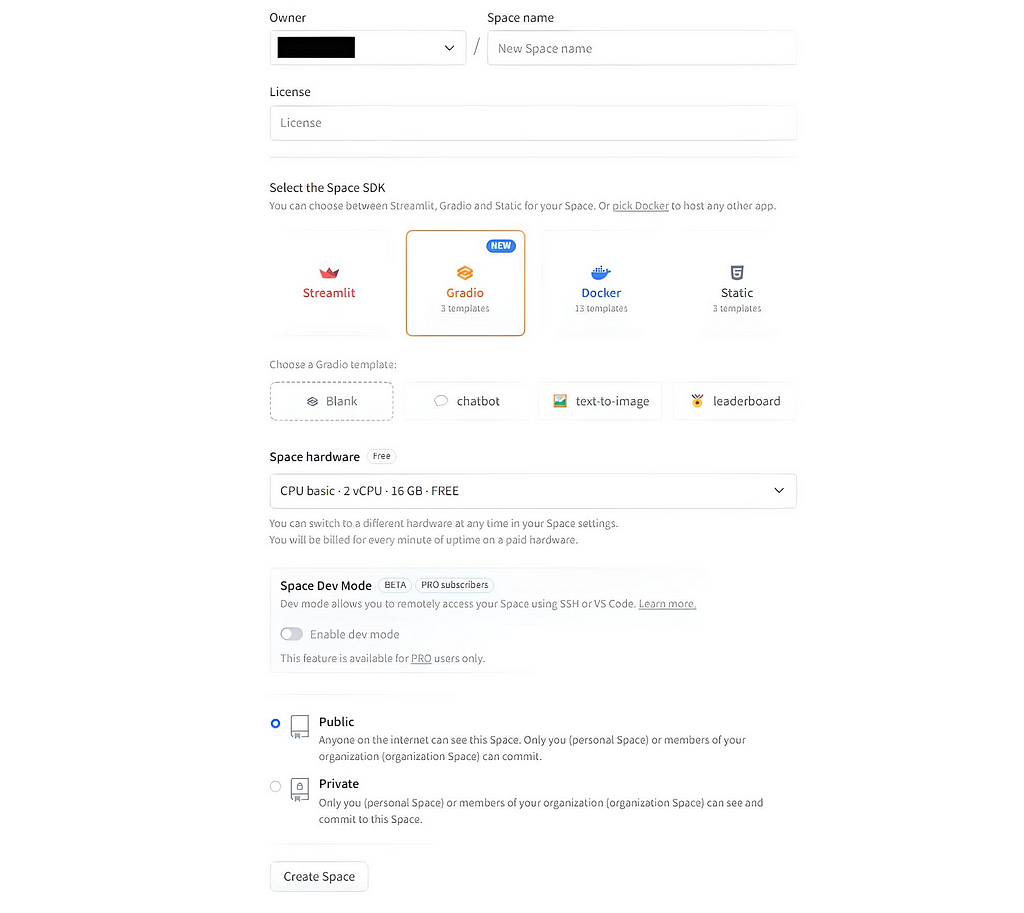
Near the top right, click the Create new Space button. You’ll see a screen like this.

- Type in a name for your new space.
- Select the licence type you want to apply to your App.
- Choose Gradio->Blank as the SDK type
- Click Public if you want the world to see your App
- Click the Create Space button
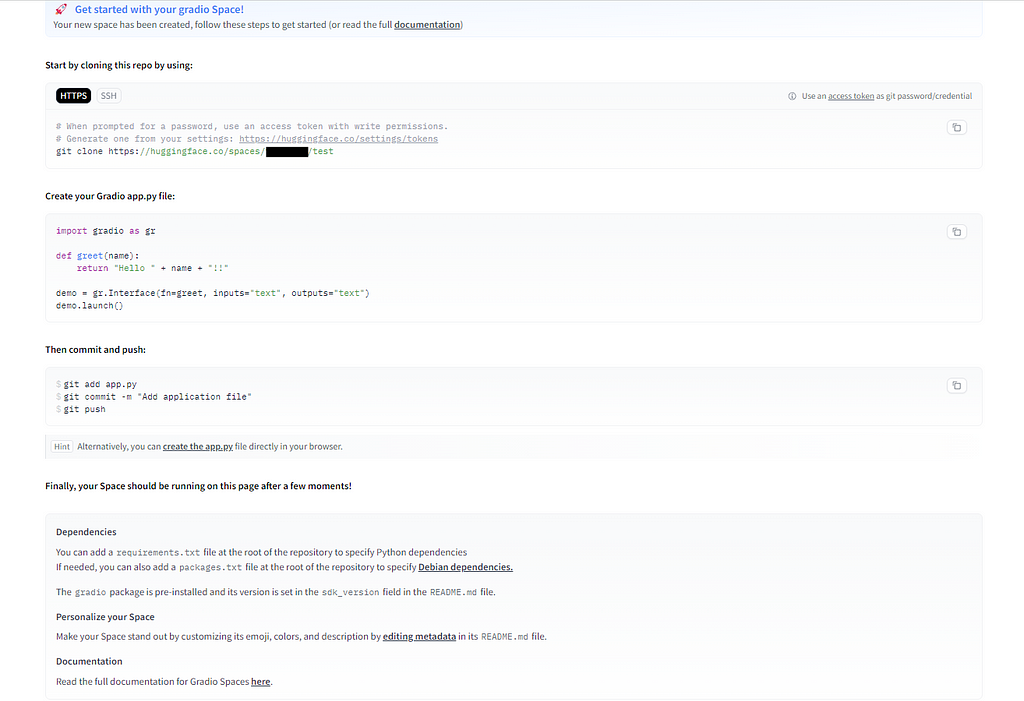
After a few seconds, you should be greeted by a page that says your Space has been created, together with instructions on how to proceed.
Like this.

The final thing you may want to do with your HF Spaces is set up one or more secret keys. This will depend on your app, but for example, if it uses things like API Keys this is where you should set them up.
To do that, in your HF Spaces, click on the Settings link near the top right of the page. On the page that’s displayed, scroll down until you see a section labelled Variables and secrets.
Click the New Secret button and fill in the details as required. In my case, I was using a Groq API key, so I called mine GROQ_API_KEY as that’s how I was referencing it in my original code.
Setting up the coding environment
I’m showing how to do this using WSL2 Ubuntu for Windows, but you can just as easily do this under Windows directly. If you want to try out Ubuntu for Windows I have a comprehensive guide on installing it that you can find here.
From this point on, the setup is similar to what you would do if developing any regular app using Git. But, instead of deploying code etc … to a remote repository on GitHub, we deploy to a remote repository hosted by Hugging Face Spaces.
What I normally do is have a Projects directory where I put all my separate applications. For example,
$ cd /usr/tom
$ mkdir projects
$ cd projects
Next, initialise your Git environment if you haven’t already done so.
$ git config --global user.email "you@example.com"
$ git config --global user.name "Your Name"
Deploying your App
The next stage is to git clone the HF repository that was created as part of your Spaces creation. You can see the command you need by referring to the instruction page that was displayed earlier. In my case, it was this,
$ git clone https://huggingface.co/spaces/taupirho/gradio_multi_file_rag
This will create a sub-folder under Projects containing a README.md and .gitattributes files
Now create your app.py containing your Gradio code. My code looked like this.
# Contents of my app.py file
#
import gradio as gr
from huggingface_hub import InferenceClient
import os
import groq
import warnings
import asyncio
from llama_index.core import VectorStoreIndex, SimpleDirectoryReader, Settings
from llama_index.llms.groq import Groq
from llama_index.embeddings.huggingface import HuggingFaceEmbedding

# A warning may appear which doesn't
# affect the operation of the code
# Suppress it with this code
warnings.filterwarnings("ignore", message=".*clean_up_tokenization_spaces.*")

# Global variables
index = None
query_engine = None

# Initialize Groq LLM and ensure it is used
llm = Groq(model="mixtral-8x7b-32768")
Settings.llm = llm  # Ensure Groq is the LLM being used

# Initialize our chosen embedding model
embed_model = HuggingFaceEmbedding(model_name="sentence-transformers/all-MiniLM-L6-v2")

# These are our RAG functions, called in response to user
# initiated events e.g clicking the Load Documents button
# on the GUI
#
def load_documents(file_objs):
    global index, query_engine
    try:
        if not file_objs:
            return "Error: No files selected."

        documents = []
        document_names = []
        for file_obj in file_objs:
            document_names.append(file_obj.name)
            loaded_docs = SimpleDirectoryReader(input_files=[file_obj.name]).load_data()
            documents.extend(loaded_docs)

        if not documents:
            return "No documents found in the selected files."

        # Create index from documents using Groq LLM and HuggingFace Embeddings
        index = VectorStoreIndex.from_documents(
            documents,
            llm=llm,  # Ensure Groq is used here
            embed_model=embed_model
        )

        # Create query engine
        query_engine = index.as_query_engine()

        return f"Successfully loaded {len(documents)} documents from the files: {', '.join(document_names)}"
    except Exception as e:
        return f"Error loading documents: {str(e)}"

async def perform_rag(query, history):
    global query_engine
    if query_engine is None:
        return history + [("Please load documents first.", None)]
    try:
        response = await asyncio.to_thread(query_engine.query, query)
        return history + [(query, str(response))]
    except Exception as e:
        return history + [(query, f"Error processing query: {str(e)}")]

def clear_all():
    global index, query_engine
    index = None
    query_engine = None
    return None, "", [], ""  # Reset file input, load output, chatbot, and message input to default states


# Create the Gradio interface
with gr.Blocks(theme=gr.themes.Soft()) as demo:
    gr.Markdown("# RAG Multi-file Chat Application")

    with gr.Row():
        file_input = gr.File(label="Select files to load", file_count="multiple")
        load_btn = gr.Button("Load Documents")

    load_output = gr.Textbox(label="Load Status")

    msg = gr.Textbox(label="Enter your question")
    chatbot = gr.Chatbot()
    clear = gr.Button("Clear")

    # Set up event handlers
    load_btn.click(load_documents, inputs=[file_input], outputs=[load_output])
    msg.submit(perform_rag, inputs=[msg, chatbot], outputs=[chatbot])
    clear.click(clear_all, outputs=[file_input, load_output, chatbot, msg], queue=False)

# Run the app
if __name__ == "__main__":
    demo.queue()
    demo.launch()
There is one change you should make to your code if it uses things like API Keys. In my code, for example, I initially had a line like this,
...
os.environ["GROQ_API_KEY"] = "YOUR_GROQ_API_KEY"
...
I was able to remove this completely since I had already set my GROQ API KEY as an HF Spaces secret, labelled GROQ_API_KEY. HF automatically assigns whichever label you put on a secret to an equivalent O/S environment variable with the same name as your secret label.
Next, create a requirements.txt file that contains all the external libraries e.g. Gradio, Groq etc … that your application code needs to be able to work.
Mine looked like this,
# Contents of my requirements.txt file
#
huggingface_hub==0.22.2
gradio
groq
llama-index-llms-groq
llama_index
openpyxl
llama-index-embeddings-huggingface
docx2txt
The best practice is to also update the README.md file to let users know what your app does and/or how to use it.
Now all our code changes are done. The last thing we need is to authenticate ourselves to our host provider (i.e. Hugging Face). This is where the token we created earlier comes into play.
Type the following in at your system command line, replacing your_hf_username & your_hf_spaces_namewith your own HF user and space names.
$ git config --global credential.helper store
$ git remote set-url origin https://your_hf_username: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@huggingface.co/spaces/your_hf_username/your_hf_spaces_name
Now to finally deploy our app properly.
$ git commit -am "Update Gradio App"
$ git push
Assuming all your code is correct, you should see on your HF Spaces page (via the Files link near the top right) that your files have been updated to the HF Spaces repository.
Click on the App link (also near the top right of your Spaces page) and you’ll see the progress of your app build.
Any errors will be apparent, and you should go through the process of fixing any locally before committing and pushing your changes to your HF Spaces repo as before.
If all is OK, after a minute or two the build will complete and your app should be displayed for you to try out.
Congratulations, you have just deployed your Gradio APP to HF Spaces!
If you want to check out my HF Spaces app, click here.
Also, the app.py, requirements.txt and README.md files are viewable by anyone using the Files link near the top right of my HF Space.
Summary
Well done if you made it to the end and managed to deploy your app to the web. There are a lot of moving parts to it, but no individual step is particularly complex.
In this article, I showed how to deploy a Gradio app to the web. Along the way, I explained the prerequisites required, how to set up a Hugging Face account and create a Hugging Face Space.
I then explained in detail the steps required for deployment including authentication with Hugging Face and the uploading of files to your Git repository on Hugging Face Spaces.
OK, that’s all for me just now. I hope you found this article useful. If you did, please check out my profile page at this link. From there, you can see my other published stories, follow me or subscribe to get notified when I post new content.
I know times are tough and wallets constrained, but if you got real value from this article, please consider buying me a wee dram.
I think you’ll find these articles interesting if you liked this content.
Build and Deploy a Multi-File RAG App to the Web was originally published in Towards Data Science on Medium, where people are continuing the conversation by highlighting and responding to this story.
from Datascience in Towards Data Science on Medium https://ift.tt/3WrXR8b
via IFTTT


